Official Luthiers Forum! http://www-.luthiersforum.com/forum/ |
|
Making adjustment for binding http://www-.luthiersforum.com/forum/viewtopic.php?f=10102&t=9867 |
Page 1 of 1 |
Author: | robertD [ Sun Dec 17, 2006 3:23 am ] |
Post subject: | |
Hello All, I have a binding question? It appears that I have made a slight blunder. ![]() I Hate to admit it, but, I did not thin down the ends of some the braces enough to allow for the width of the binding (that is, measuring along the plane of the sides of the guitar). My first thought was to purchase a wider binding made of material other than ivoroid, which I’m sure would enhance the appearance of the guitar. Though, considering the toughness of ivoroid, it makes an excellent edge protector. Also, while cutting for the binding on the back of the guitar, I had a little tear out. I’m thinking of adding purfling to the back now. Open to all suggestions. Signed, Builder of first guitar, Newbe Robert |
Author: | Mark Hanna [ Sun Dec 17, 2006 3:55 am ] |
Post subject: | |
Robert, is there any chance you could post a picture(s) if this? |
Author: | Rod True [ Sun Dec 17, 2006 4:06 am ] |
Post subject: | |
Hi Robert, don't know if I've welcomed you to the OLF so Welcome here. So, the channel for the binding is not deep enough to cover the brace stock which shows through on the side. How much showing are we talking about once the binding would be on? You could add side purflings if it's not to much, otherwise there may be only a couple of other options. The most obvious fix is to use wider binding material. Or (this is more of an "unfortunately I had to do this" type of fix). Depending on your side wood (if it's dark), you could cut out the brace wood (light color wood I assume) and make a "plug" of the off cut from the side wood. If it's EIR it should hide very well, try to match the grain pattern and coloring. But this is only my initial though, I'm hoping that some more experienced builder will chime in. (I'm sure they will have better fixes than these) I guess there could be another fix if you don't want to do either of the first. If you don't have much depth to go, you could thin the edge of the top to come down enough to cover the "peaking" brace wood. As for the back, adding purfling is usually the easiest way to correct any tear out. And remember, once it's done if anyone asks about the back purfling, You planned it that way. |
Author: | robertD [ Sun Dec 17, 2006 5:47 am ] |
Post subject: | |
Hello, Mark & Rod Thanks for the welcome! I introduced myself initially at the “a word of caution” thread. I did take some pictures and some measurements. It looks like a binding of at least 5/16" wide will do the job. A purfling of just a bit over 1/8" wide would suffice for the tear out problem on the back. Ya know, in a way I’m glad this happened. I never liked the idea of plastic on my first guitar, and I’ve really liked the idea of purfling on the back. Also, I gonna add some inlay work using paua abalone. I figure, why not try a little of everything, even if this is my first guitar! I guess I should mention that this guitar is a kit (Dreadnought) from “stewmac.com.” So, need less to say, a few steps in the building process were already done for me. However, I thought it best to start with a kit. That way, I could study the parts. Gaining some knowledge to what they should look like for my next guitar. Anyway, here’s the pics. [IMG] useruploads/robertandsons/2006-12-17_134543_Guitar_pic_1a.jp g[/IM |
Author: | robertD [ Sun Dec 17, 2006 5:51 am ] |
Post subject: | |
Uh Oh! ![]() Got any advise on how to do it better next time? Robert |
Author: | Rod True [ Sun Dec 17, 2006 5:56 am ] |
Post subject: | |
for the pictures, just make sure you hit "enter" inbetween each image than you'll be fine. Sounds like you got a good handle on the fix required. 5/16 will be fine for the binding or the side purfling idea would work out too. |
Author: | robertD [ Sun Dec 17, 2006 6:09 am ] |
Post subject: | |
I'm gonna try these pics one more time! ![]() ![]() useruploads/robertandsons/2006-12-17_140943_Guitar_pic_3a.jp g"> |
Author: | robertD [ Sun Dec 17, 2006 6:11 am ] |
Post subject: | |
O.K. I think I got it ! Here's the third one. ![]() |
Author: | peterm [ Sun Dec 17, 2006 6:28 am ] |
Post subject: | |
Robert, your guitar looks great and welcome to the forum!! I would suggest re-routing to go over the braces and then use a wider purfling below the bindings to cover that area.... good luck, |
Author: | phil c-e [ Sun Dec 17, 2006 6:31 am ] |
Post subject: | |
robert, looks like you need a little bit deeper binding (maybe something with a thin purfling line aleady attached) and a bit of a patch job on the tear out. with the patch i'd just make sure to keep the thing shaped the way it is now. if you try to 'neatin' it up with a triangle or rectangle it's going to stick out. a bit of monkeying around with a little chip of mahogany and i think you'll make it invisible. the good news is that the rest of your build is looking top notch for the first guitar. looks like you're doing great work. don't let this little thing get you discouraged on #1. forge ahead. phil |
Author: | Mark Hanna [ Sun Dec 17, 2006 7:55 am ] |
Post subject: | |
Robert, your guitar is quite nice. I agree with Peter. Rout out the channel and add perfling. In future guitars you might consider not having the braces come all the way through the sides. I stop mine when I'm through the kerfing. I don't have the brace go through the sides. Just a consideration. Good luck! |
Author: | crich [ Sun Dec 17, 2006 3:13 pm ] |
Post subject: | |
I found that if I put on a quick coat of shellac, I don't have the tearout problems and seeing that I tend to beat thing up, it does offer some protection. You can always sand it back off later. Clinton |
Author: | robertD [ Mon Dec 18, 2006 12:05 am ] |
Post subject: | |
Hey All, Thanks for the positive comments! Being the first guitar, I wasn’t real sure how I was doing. I will say that I have been extremely careful at every step. Taking my time, and studying each phase very well before I start it. Now, when I say “taking my time” I mean really taking my time. I’ve been working on this guitar since JULY!!! O.K. I’m gonna try to address what everyone has said. 
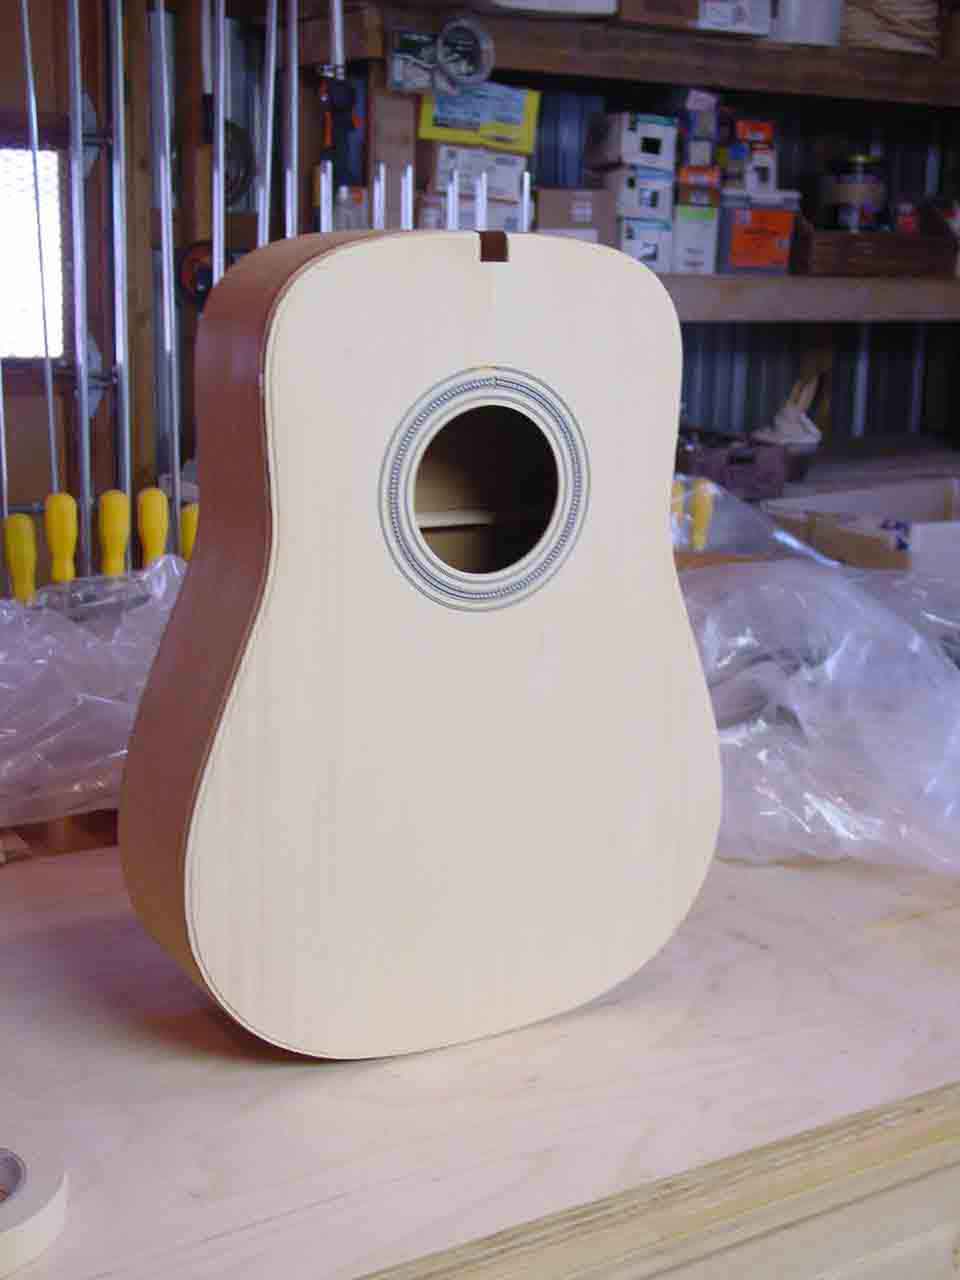
First. I plan to finish the guitar as close as possible to the natural color of the woods. I know this will not be the traditional look of a dreadnought, but, I’m a big fan of natural colors. I think that negates any kind of patch. Also, I will be using “True Oil” as my final finish on the guitar. Peter - Are you suggesting I use the black ivoroid I already have along with a new purfling imbedded into the side of the guitar next to the binding? I do like that idea. However, I’m still sort of hooked on the idea of wider binding. Just got to figure what kind of binding would look best with natural mahogany. Phil - I like your idea. Where do I find such binding/purfling combo? 
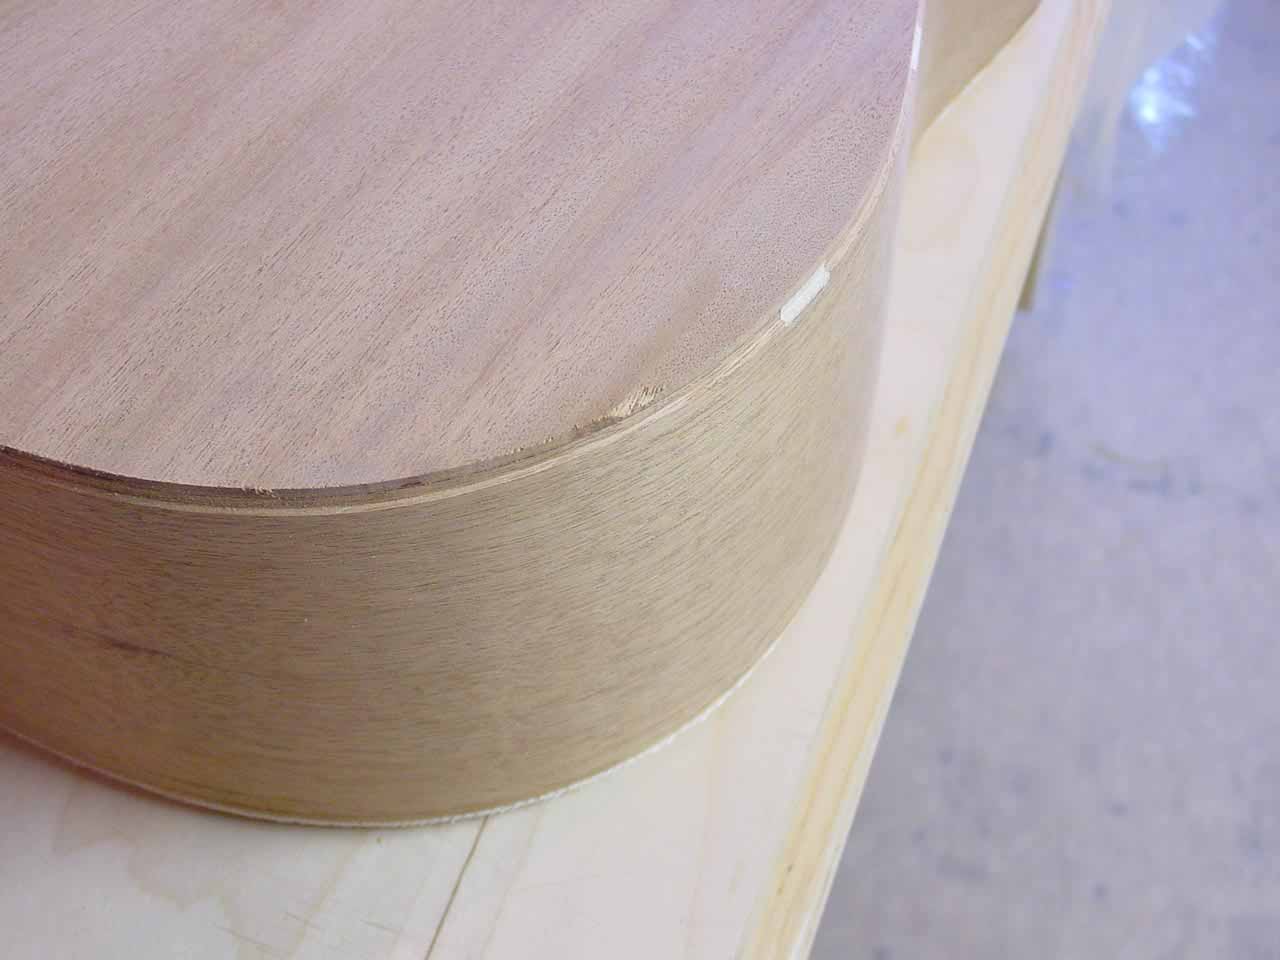
Mark - I didn’t know you could do that with braces. I followed the “STEWMAC” instructional to the “T.” accept for the screw up part, of course. Hesh - Thank you for your concern! Actually, the cutting went very well! I think the tear out was due to the simple nature of wood. Sometimes, no matter how carful you are, its gonna happen. O.K. to answer your question Hesh. Here’s what I got - I bought the router bit & bearing set from GRIZZLY.COM. I devised a jig to work in conjunction with my router table. I put a lot of thought onto the jig before I built it, and I must say, I’m pleased with the way its working. However, there is definitely room for improvement. I’m thinking of incorporating some bearings for a guide, instead of a solid surface. If’n ya want, I'll post some pics of this baby! Clinton - like the idea of shellac! I’m gonna remember that one. Also, liked your pigs, dog, cat thing! Ever heard this one? “The best laid plans of Mice and Men are usually about equal” don’t know if that applies here, but it’s a good one anyhow! Thanks to All, Robert |
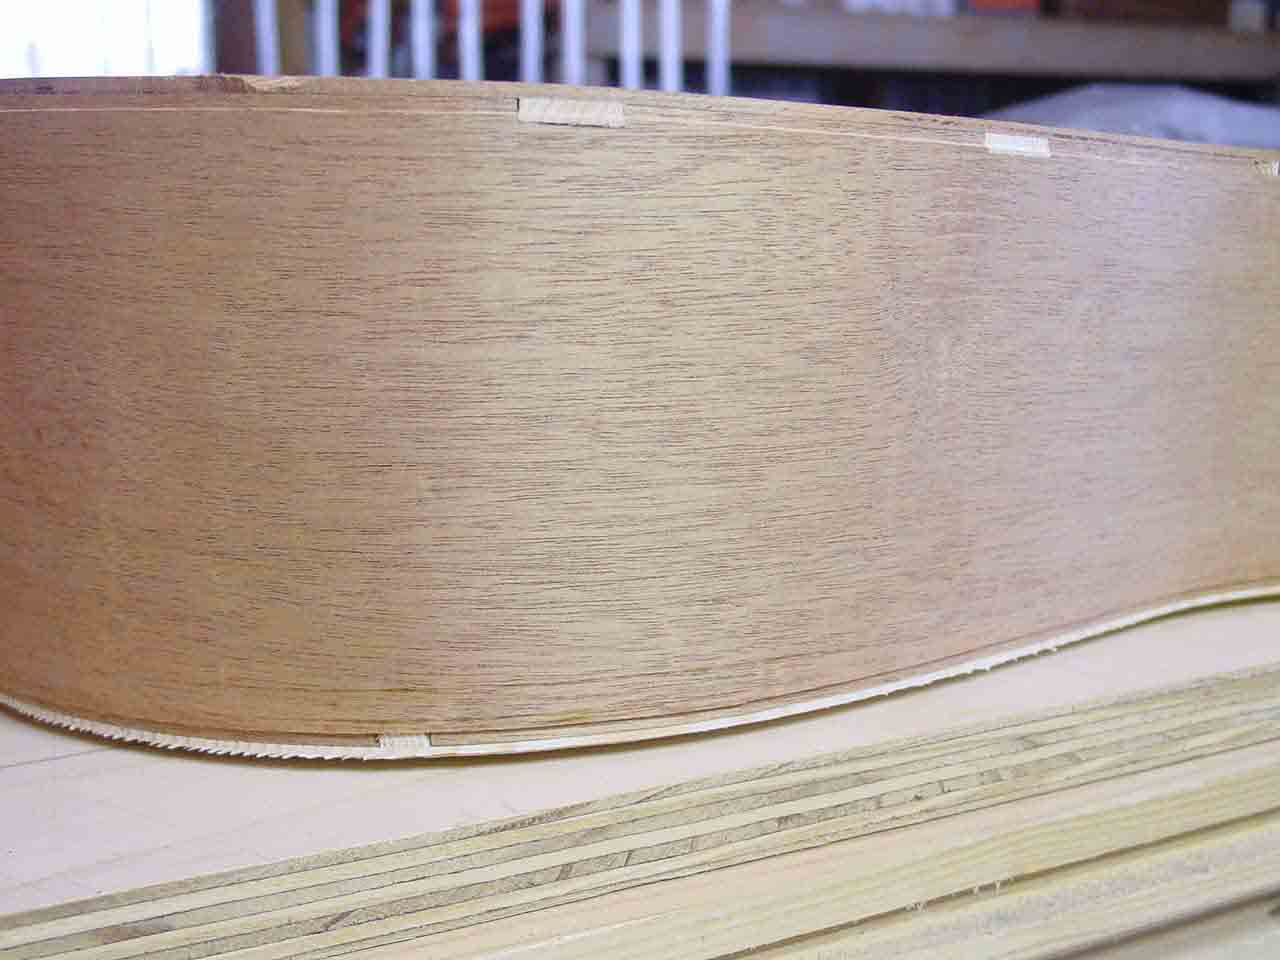
Author: | burbank [ Mon Dec 18, 2006 1:42 am ] |
Post subject: | |
Robert, Nice to have you! Stewmac sells binding with purfling attached, but I think only wood. You could glue up your own onto plastic or ivoroid. If you go for the patch, you might get better results if you take the patch from the scrap from that area when you trimmed the back flush to the sides. Use it in the same orientation that it was in while it was still attached and you could well end up with an invisible fix. |
Author: | robertD [ Tue Dec 19, 2006 9:49 pm ] |
Post subject: | |
Thanks Pat, I think your right about using a scrap. I may find one lying around the router table. Checked out Stewmac, but their binding was (.080" X .25") where as I need a min. (.060" X 5/16") I can't change the depth at .060" unless I buy a new router bit & bearing. Thanks again, Robert |
Page 1 of 1 | All times are UTC - 5 hours |
Powered by phpBB® Forum Software © phpBB Group http://www.phpbb.com/ |